


Bit of a History
During the early stage of computing IT Infrastructures were completely physical and they were managed completely physically by the experts. Then slowly with the rapid growth of high performance computing hardwares, virtualization and Internet raised the adoption of virtualization. These virtulized Infra were managed with various scripting languages.
Then came the era of the Cloud, driving the innovation entirely to the next level where everything possible was virtualized be it Servers, Queues, Storage, Databases, Networks, Caches, CDNs, Firewalls and more.
All these infrastructure management were abstracted with a simple API call, for eg. We can create a bucket using this create bucket API. The challenges with the APIs are that we need to deal with low level details like headers, authentication information, retries, dependencies, payloads, failure handling, logging, state management and many more.
Then comes the IAC where all these low level complexities are orchestrated through the human friendly abstractions.
Infrastructure as a Code
Infrastructure as a code abbreviated as IAC is the management of IT Infrastructures like Servers, Networks, Storage, Databases, Queues either in the Cloud or the on-prem data centers through the use of some coding pattern or some form of templating language. IAC is basically a representation of Infrastructure in the form of a Code/template such that it can completely go through a similar SDLC life cycle. IAC can be the part of a repository, reviewed similar to the code-base and be the part of the CI/CD pipeline to build and deploy it through automation.
CloudFormation
Verbatim: AWS CloudFormation gives you an easy way to model a collection of related AWS and third-party resources, provision them quickly and consistently, and manage them throughout their lifecycles, by treating infrastructure as code.
Beauty of CloudFormation is that it is not a tool unlike other IACs like terraform rather it is a AWS Service which provides IAC solution, which means no additional tool required to be configured. All we need is the permission to use the CloudFormation Service, then use AWS CLI or AWS Console to do rest of the operations.
Working
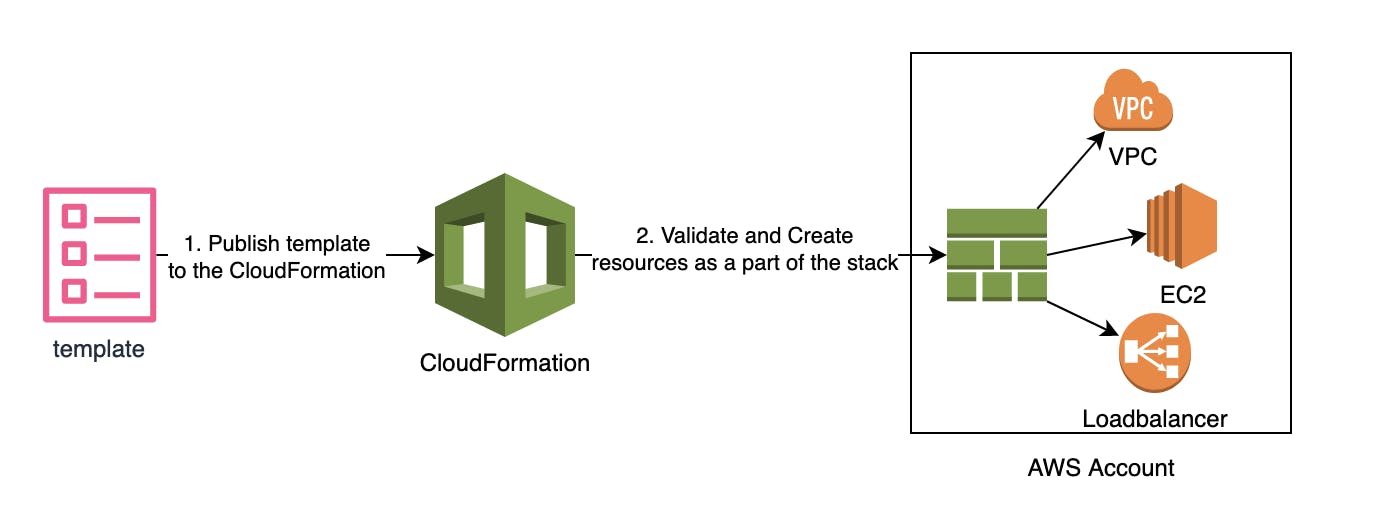
The working of the CloudFormation can be explained pretty well with the simple architecture diagram. First you will need to create a template where you will declare all the resources you want to create in a .json or .yaml file. Then either use the AWS SDK, AWS CLI or the AWS Console to provide your template to the CloudFormation Service and then CloudFormation takes care of provisioning and configuring the resources for you.
Hello World
Now let’s create a S3 Bucket using CloudFormation. We will use the template below and provide it to the CloudFormation Service to provision the S3 Bucket. The template can be provided using AWS CLI or through AWS Console as below.
Sample Template Please create a file name s3.yaml and add the following content.
---
Resources:
 S3Bucket:
   Type: 'AWS::S3::Bucket'
   Properties:
     BucketName: 'hello-world-demo-bucket-balman'
Deploy with AWS CLI Fire the command below to create the stack.
cd <template-directory>
aws cloudformation create-stack --stack-name hello-world-stack --template-body file://s3.yaml --profile sandbox --region sandbox

{
"StackId":"arn:aws:cloudformation:us-east-1:856960422202:stack/hello-world-stack/ae626820-1504-11ec-86e1-0e5ae768be0f"
}
OR Use AWS Console
Anatomy of Hello World Template
---
# This section defines the resources
Resources:
# Your preferred name for this resource. This is called
# logical Id and should be unique within the template.
 MyS3Bucket:
# Resource type of the resource you want to create. eg.
# AWS::EC2::SecurityGroup is the type for creating security group.
   Type: 'AWS::S3::Bucket'
# Set of properties that is supported by this particular service
   Properties:
     BucketName: 'hello-world-demo-bucket-balman'
CloudFormation Template
CloudFormation template is a plain text file where all the required resources and their configuration are written in the pre-defined format. CloudFormation template supports both .yml and .json. I prefer to use yaml because it is more human readable.
Structure
CloudFormation template can only have sections that are mentioned below. They can be in any order but regarding the convention and readability following ordering is done usually. Please find the respective description of each section below.
Note: Resources is the only mandatory section of template and you should define at least one resource to create.
---
AWSTemplateFormatVersion: "AWS Template versions. If not provided the latest version will be used"

Description: "Description of the template"

Metadata: "Collection of metadata objects that provides additional information about the template."

Parameters: "Values that can be passed at runtime to change the behavior of the template. It is similar to passing argument to a function"

Rules: "Validates a parameter or a combination of parameters passed to a template during a stack creation or stack update."

Mappings: "A collection of static keys and values that can be used to get values based on the conditions. eg. when you want to use different AMIs for different regions you can use region and key and AmiId as value"

Conditions: "List of conditions that can be used to create certain resources based on the conditions. eg. you might not want to create all resources in your non production environment"

Transform: "This is a more advanced topic of CloudFormation where CloudFormation templates can be transformed from one form to another form. eg. SAM template, AWS::Include can dynamically include the CloudFormation template snippets hosted in your s3 bucket"

Resources: "This is where you define all of your resources and their configurations."

Outputs: "List of certain attributes of the resource that you want to expose for eg. bucket-name for s3 bucket resource. Outputs can also be exported which can be imported in another stack for use. eg. export helps when you could have a VPC stack and another ec2 instance stack needs the VPCId"
CloudFormation Stack
During the resource creation process CloudFormation creates a separate resource called CloudFormation stack which bundles all the created resources and preserve their state, so that they can be managed later.
Analogy: CloudFormation template is like a Class whereas the CloudFormation Stack is like an object where you can create as many stacks as you want from a single template.
Authoring Template from Scratch
1. Know the Resource
The very first step is to have knowledge about the service or the resource you want to create. You should know the various attributes of the resources and know what happens when these attributes are set to default or overridden by certain values. For eg. you should be able to know what does these attributes instance_type, ami_id mean in context to creating EC2 Instance.
2. Find the documentation
All the resources supported by the CloudFormation are documented in the AWS CloudFormation docs, see the the list of supported resources. Every CloudFormation has the same format as described below(Sample docs)
Syntax:
This section provides the syntax to define particular resource in the template. Syntax must have Type(what resource to create) and its Properties(how to create).
Type: <AWS Resource Type>
Properties:
   Key: Value
Properties :
This section contains the details of individual property.
- Description: Describes the essence of the property
- Required: Shows whether property is required or not
- Type: data type of the property. eg. string, number, list
- Update requires: Specifies behavior when this property is updated. Behavior can be No Interruptions, Some interruptions, Replacement
Return Values :
Shows what value is return when referenced to the resource. It is usually name, Id, Arn of the resource.
Examples :
This section shows the sample examples of the given resource and can be helpful to get started with the template.
3. Create the template file
Let's create a minimal template to create an EC2 Instance and save it as ec2.yaml. I have only specified ImageId and SubnetId which are required to launch the Instance.
  Resources:
    MyEC2Instance:
      Type: AWS::EC2::Instance
      Properties:
        ImageId: ami-09e67e426f25ce0d7 # replace with your own values
        SubnetId: subnet-066a074e239e6a0a3 # replace with your own values
4. Create Stack
AWS CLI
aws cloudformation create-stack --stack-name 'balman-ec2-instance' --template-body file://ec2.yaml --profile sandbox --region us-east-1
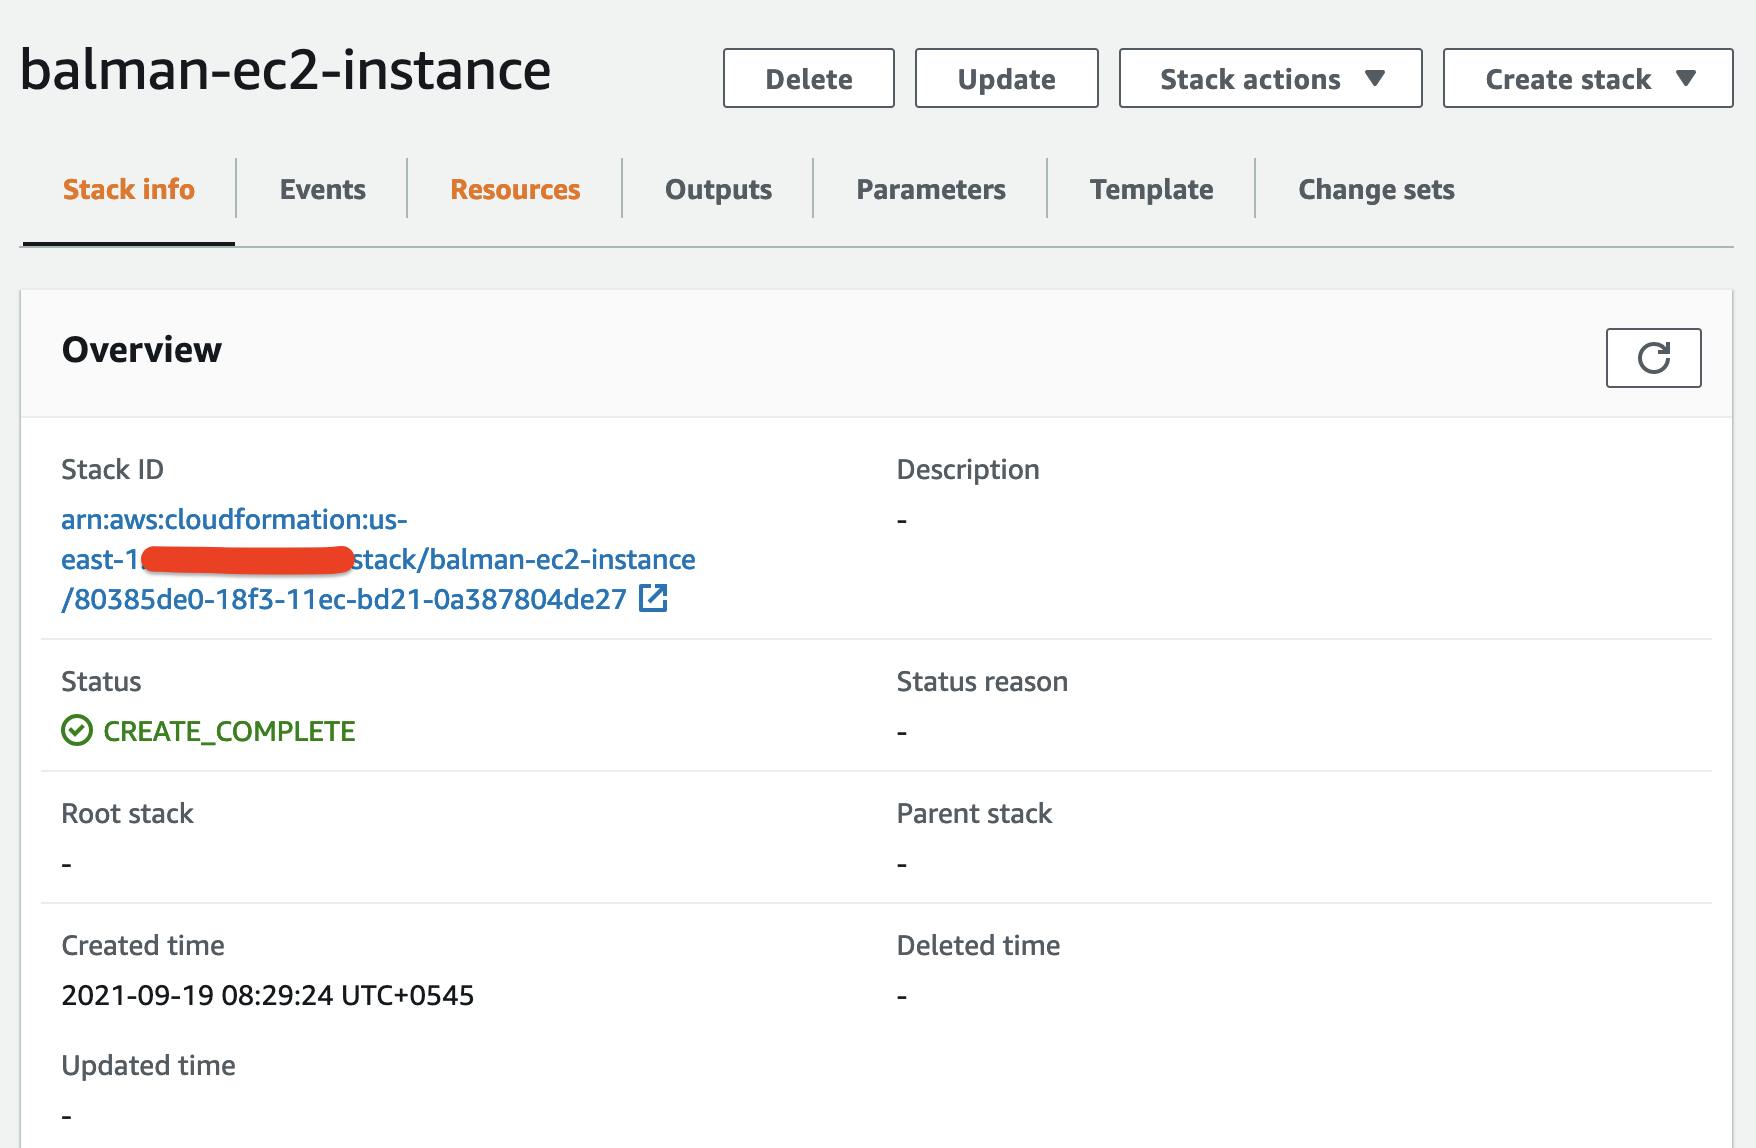
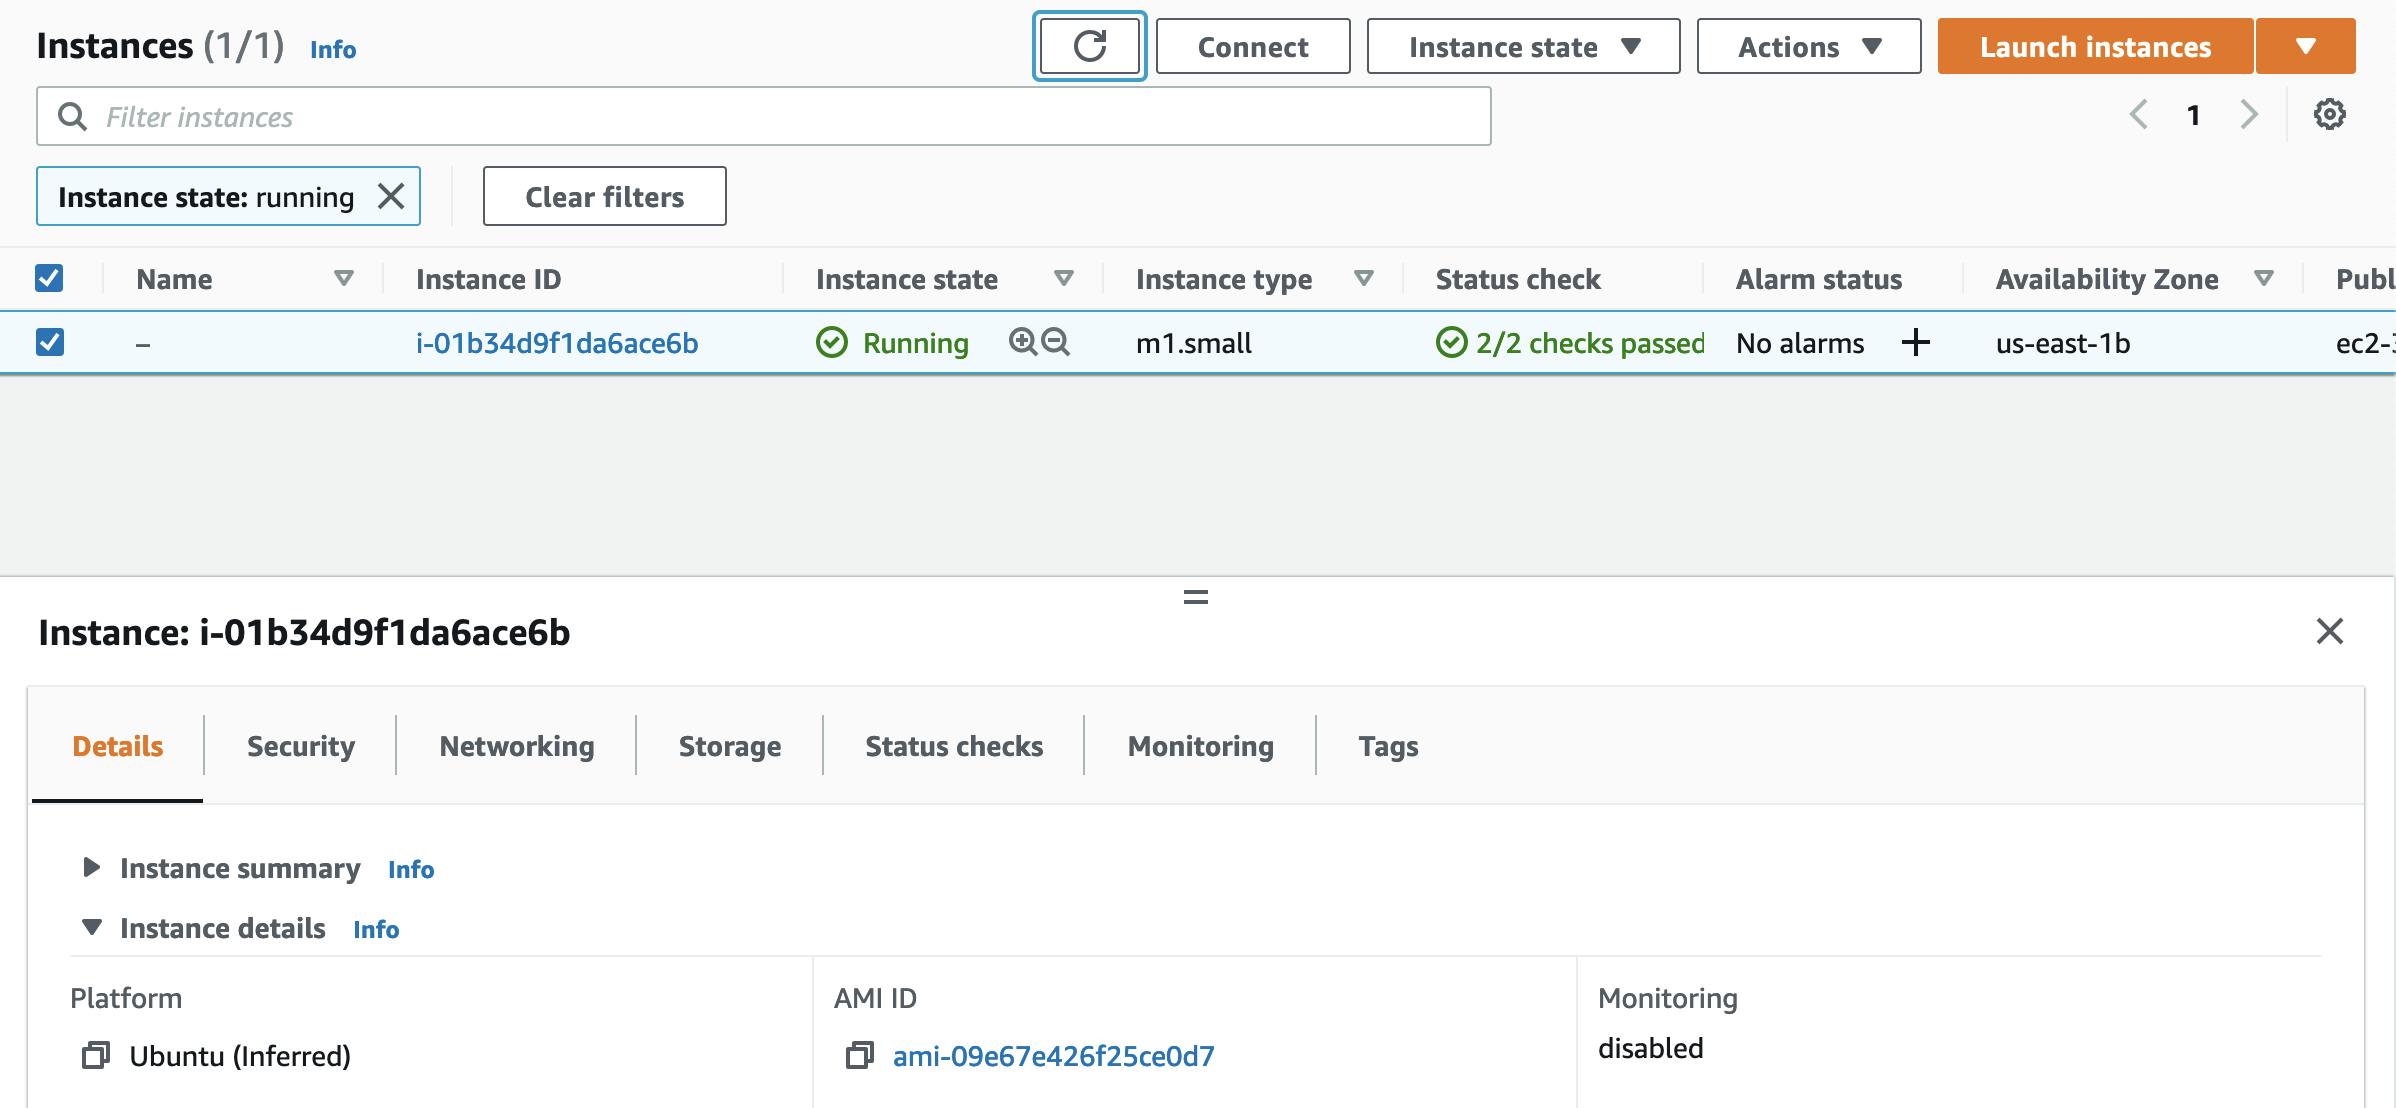
Once the stack has been created successfully you should able to see it in CloudFormation dashboard. Also in the EC2 Instances list you will be able to see the newly created EC2 Instance.
5. Managing Stack: AWS CLI
create-stack
aws cloudformation create-stack --stack-name <stack-name> --template-body file://<file-path>
update-stack
aws cloudformation update-stack --stack-name <stack-name> --template-body file://<file-path>
delete-stack
aws cloudformation delete-stack --stack-name <stack-name> --template-body file://<file-path>
wait-stack Wait commands are mostly useful when you want create your own scripts that needs to wait for certain conditions to happen.
aws cloudformation wait (stack-create-complete OR stack-delete-complete OR stack-update-complete) --stack-name <stack-name>
create-change-set
Creating change-set is equivalent to creating a dry-run before executing the actual change to the running resources. This is very important when you are working with production resources.
aws cloudformation create-change-set --change-set-name <your-change-set-name> --stack-name '<stack-name>' --template-body file://<file-path>
To look for the newly created change set go through Change sets > Change-set .
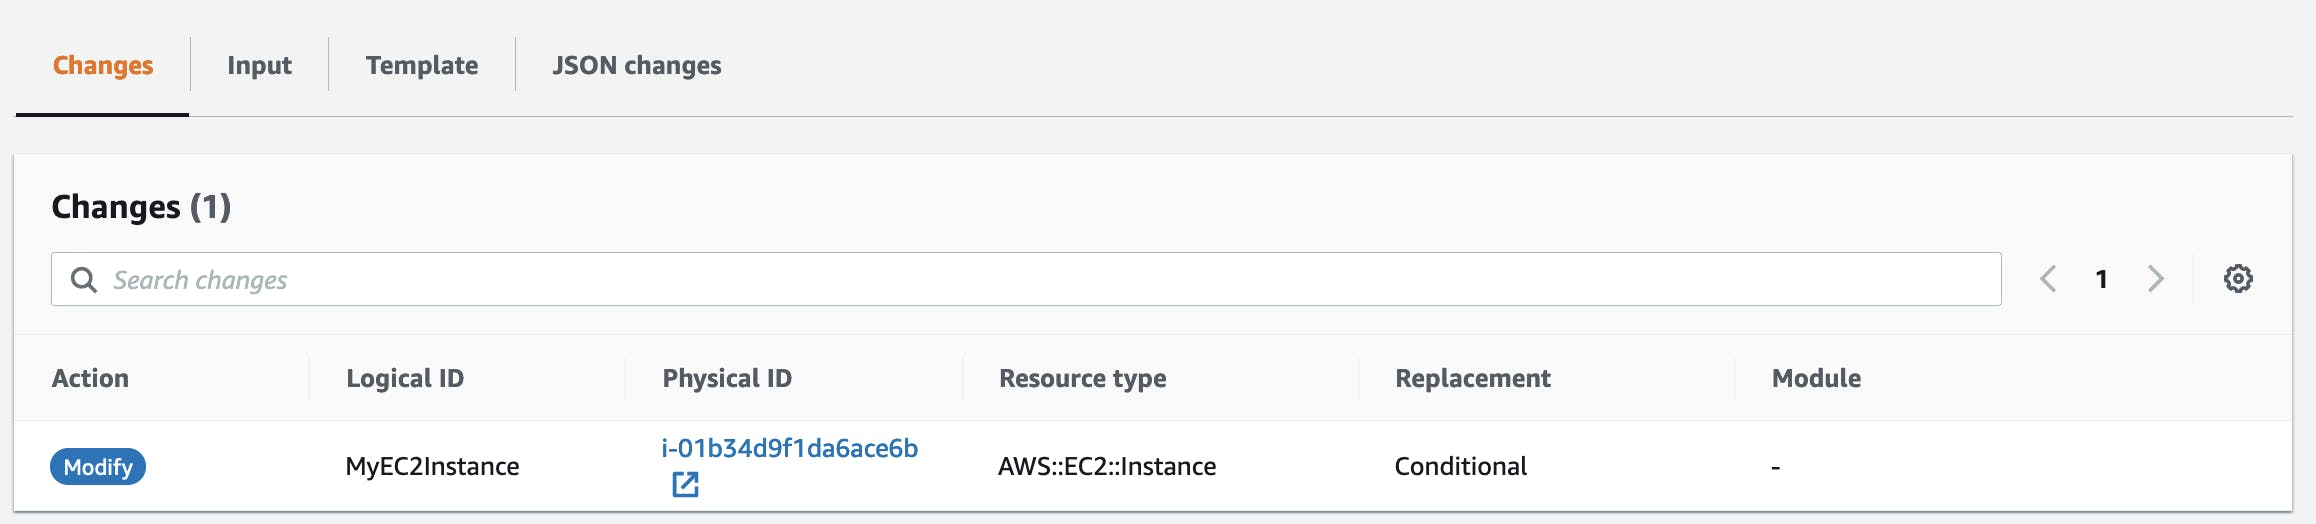
execute-change-set Change set can be executed from AWS Console or AWS CLI to apply the change.
aws cloudformation create-change-set --change-set-name <your-change-set-name> --stack-name '<stack-name>' --template-body file://<file-path>
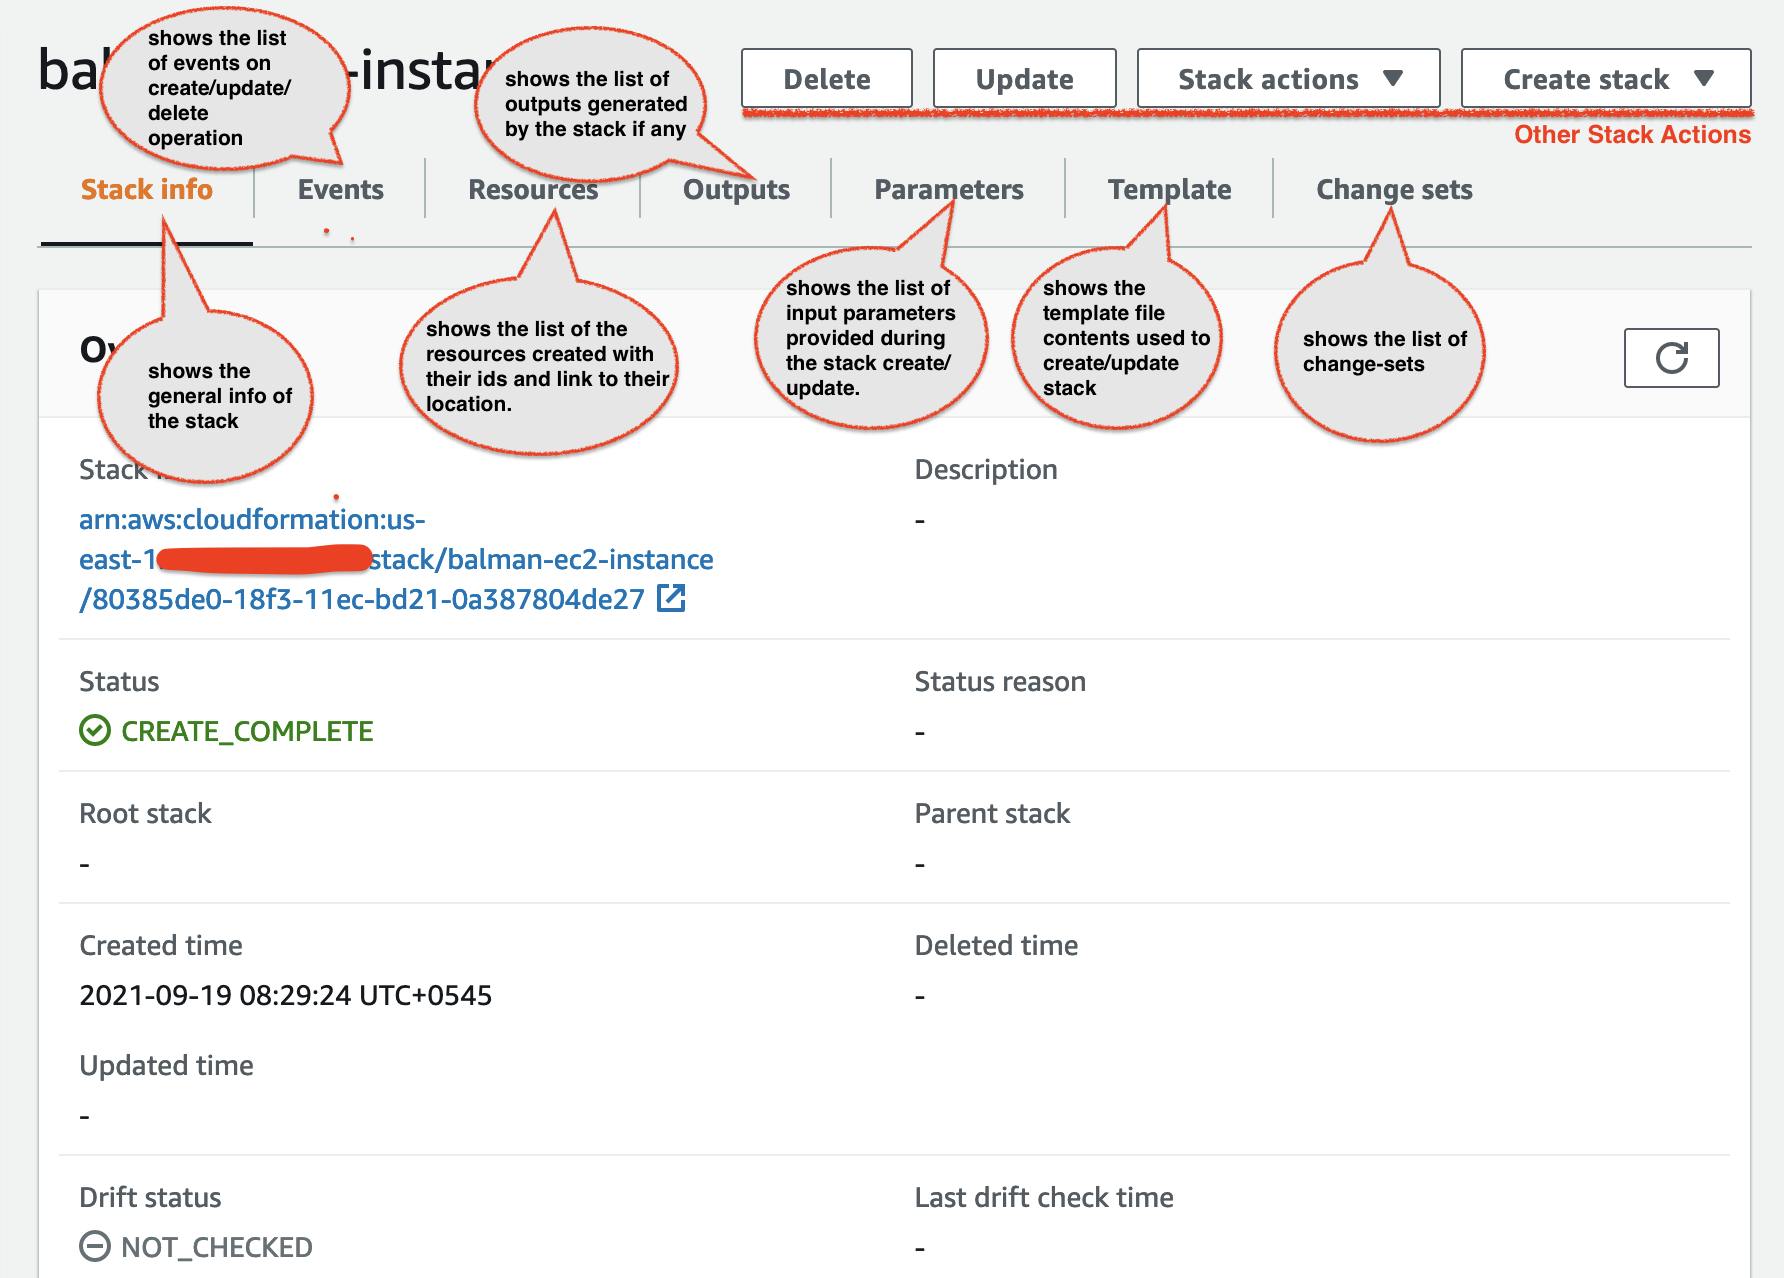
6. Managing Stack: AWS Console
One of the beauty of the AWS CloudFormation is that it provides super friendly UI to manage and see all the necessary information. Following diagram shows high level overview of what can be seen/done from the Console.
Other Concepts
1. Parameters
Parameters are like the variables of the template, they can be modified at runtime to change the attributes without needing to create a separate template. They are defined under the Parameters: section of the template. Parameter gives us various options to customize them to build reliable template like:
- Allowed Pattern(where only string with specific regex are allowed.
- Max Length, Min Length to allow input string length within the range.
- Min Value, Max Value to allow Numeric value within the range.
- Date type to allow only specific data types.
- Default values to use when no values are provided.
- Noecho option for secrets values that shouldn't be shown in the dashboard. For more details please find the AWS Docs .
Syntax:
Parameters:
  ParameterLogicalID:
    Type: DataType
    ParameterProperty: value
Example Template
Now Let's evolve our previous ec2.yaml template to use the parameters.
Parameters:
  MyInstanceType:
    Type: String
    Default: t2.micro
    AllowedValues:
      - t2.micro
      - m1.small
      - t2.small
    Description: Enter t2.micro, m1.small, or t2.small. Default is t2.micro.
Resources:
  MyEC2Instance:
    Type: AWS::EC2::Instance
    Properties:
      InstanceType: !Ref MyInstanceType
      ImageId: ami-09e67e426f25ce0d7
      SubnetId: subnet-066a074e239e6a0a3
If you do not specify parameters it will take the default value, but if you want other than default value you can pass the parameters while update/create operation. There are two ways you can specify parameters as show below:
a. Inline
aws cloudformation update-stack --stack-name 'balman-ec2-instance' --template-body file://ec2.yaml --parameters ParameterKey=MyInstanceType,ParameterValue=t2.small --profile sandbox --region us-east-1
b. Using parameters file
create a parameter file and save as .json.
[
  {
    "ParameterKey": "MyInstanceType",
    "ParameterValue": "t2.small"
  }
]
update stack
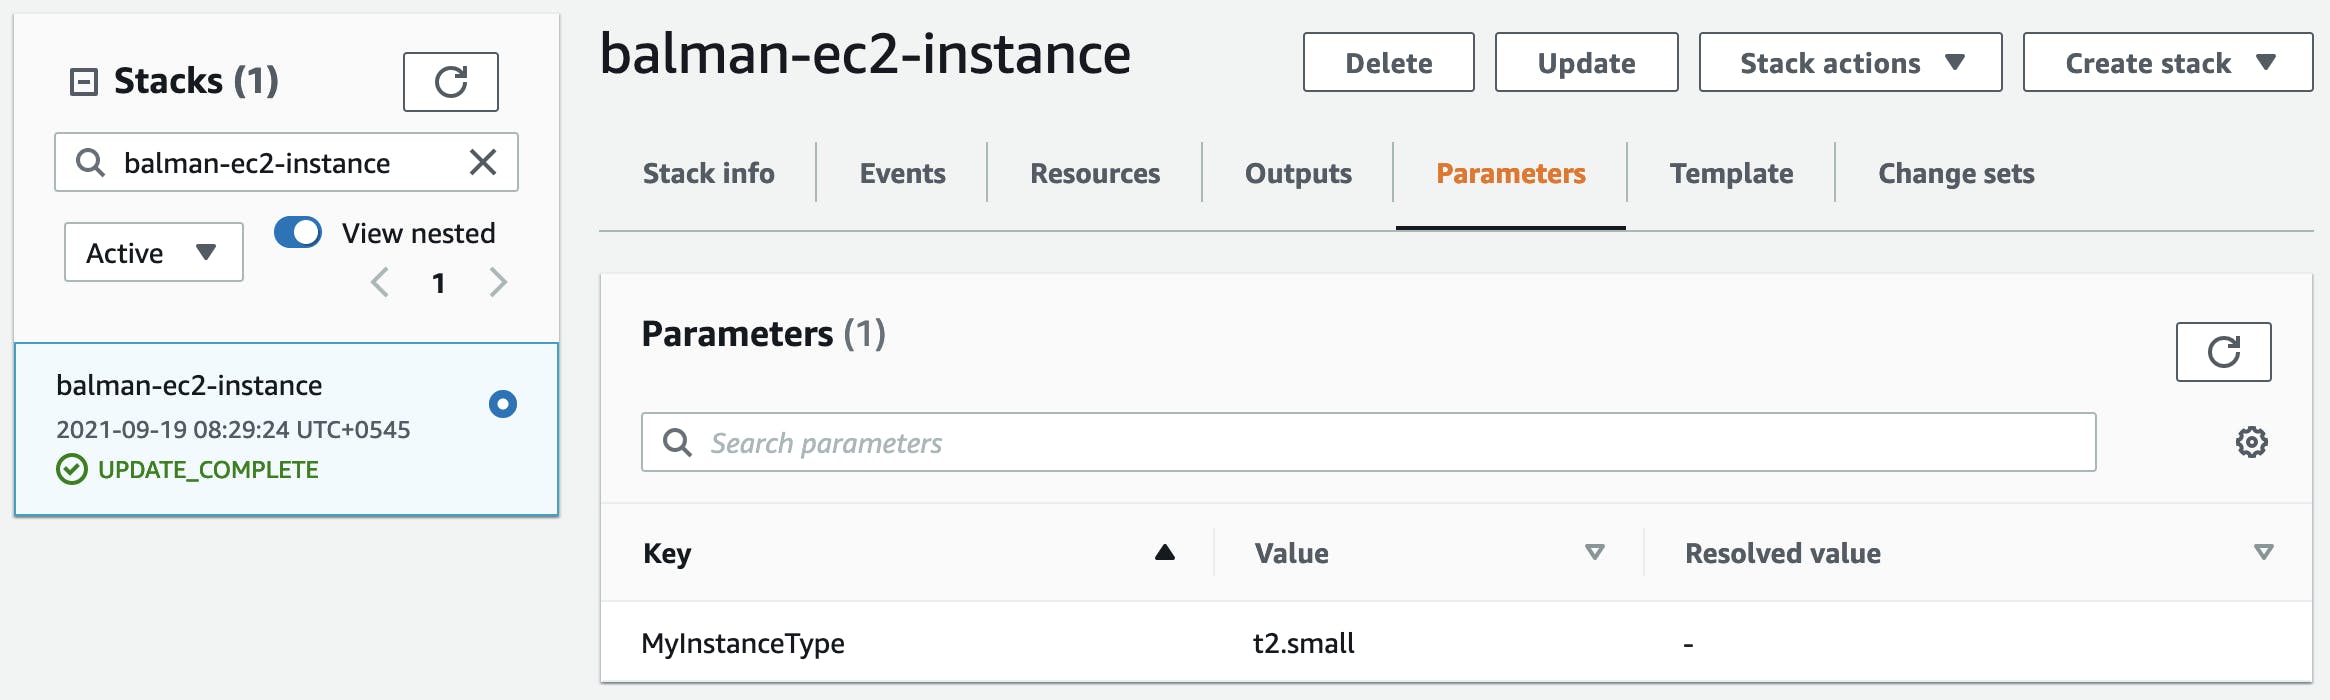
aws cloudformation update-stack --stack-name 'balman-ec2-instance' --template-body file://ec2.yaml --parameters file://params.json --profile sandbox --region us-east-1
Any of above update will update the parameter and update the respective stack as shown below
2. Pseudo Parameters
Pseudo Parameters are built-in parameters which can be used similar to the user defined parameters. It can be accessed using Ref function. eg. AWS::Region, AWS::AccountId. Please find more details in this AWS docs .
3. Built-in Functions
CloudFormation provides us various kinds of built-in functions that we can use to make our template dynamic. Functions can be used for various kinds of cases like joining, splitting the strings, getting values from the parameters, Importing outputs from another stack, Enforcing certain conditions and many more. Please find more details in this AWS Docs.
eg. FinInMap function can be used to find the specific values from the map created in the Mappings section.
syntax: !FindInMap [ MapName, TopLevelKey, SecondLevelKey ]
sample
This template supports multi-region creation of the Ec2 Instance because the AMIId will be selected by the FindInMap functions dynamically based on the region.
Parameters:
  MyInstanceType:
    Type: String
    Default: t2.micro
    AllowedValues:
      - t2.micro
      - m1.small
      - t2.small
    Description: Enter t2.micro, m1.small, or t2.small. Default is t2.micro.
  AMITYpe:
    Type: String
    Default: Ubuntu
    AllowedValues:
      - Ubuntu
      - AmazonLinux
    Description: Enter Ubuntu or AmazonLinux. Default is Ubuntu.
Mappings:
  AMIIdMap: #Use the latest values
    "us-east-1":
      "Ubuntu": "ami-09e67e426f25ce0d7"
      "AmazonLinux": "ami-087c17d1fe0178315"
    "us-east-1":
      "Ubuntu": "ami-097297e426f25ce0d7"
      "AmazonLinux": "ami-a7297e426f25ce0d7"
    "us-east-1":
      "Ubuntu": "ami-097297e426f25820d7"
      "AmazonLinux": "ami-397297e426f25820d7"
Resources:
  MyEC2Instance:
    Type: AWS::EC2::Instance
    Properties:
      InstanceType: !Ref MyInstanceType
      ImageId: !FindInMap [ AMIIdMap, !Ref 'AWS::Region', !Ref AMITYpe ]
      SubnetId: subnet-066a074e239e6a0a3
4. Conditions
Conditions are used to specify conditions in templates to define certain properties or resource only when conditions are met. eg. you might want to use different instance type for different environments or even want to prevent certain resource from provisioning. Please find more details in this AWS docs.
sample
Template below creates condition called IsProduction and use it to change instance type based on the EnvType value and provision ProdSecurityGroup resource only when the EnvType is production.
Parameters:
  EnvType:
    Type: String
    Default: nonproduction
    AllowedValues:
      - nonproduction
      - production
    Description: Enter production, nonproduction. Default is nonproduction.
Conditions:
  IsProduction: !Equals
    - !Ref EnvType
    - production
Resources:
  MyEC2Instance:
    Type: AWS::EC2::Instance
    Properties:
      InstanceType: !If
        - IsProduction
        - 't2.micro'
        - 't2.small'
      ImageId: ami-09e67e426f25ce0d7
      SubnetId: subnet-066a074e239e6a0a3
  ProdSecurityGroup:
    Condition: IsProduction
    Type: AWS::EC2::SecurityGroup
    Properties:
      GroupDescription: create sg only if the env type is production
      SecurityGroupEgress:
      - CidrIp: 127.0.0.1/32
        IpProtocol: "-1"
      VpcId: vpc-0be6d92acf7a792d4
5. Outputs
Outputs in the CloudFormation can be used to show or exchange important resources attributes created by the template like resource Id, Name, Arn across different stacks. For eg. you might have a separate template that creates VPC and another template that creates EC2 Instance/RDS. In that case you will have to export the VPCId from the VPC template and Import VPCId into EC2Instance template. Please find more details in this AWS docs .
Syntax:
Outputs:
  Logical ID:
    Description: Information about the value
    Value: Value to return
    Export:
      Name: Value to export
Example For the sake of simplicity I have two templates one creates security group and exports its Id and the other template Imports the Id and use it in the EC2 Instance.
sg-outputs.yaml
Resources:
ProdSecurityGroup:
Type: AWS::EC2::SecurityGroup
Properties:
GroupDescription: create sg only if the env type is production
SecurityGroupEgress:
- CidrIp: 127.0.0.1/32
IpProtocol: "-1"
VpcId: vpc-0be6d92acf7a792d4
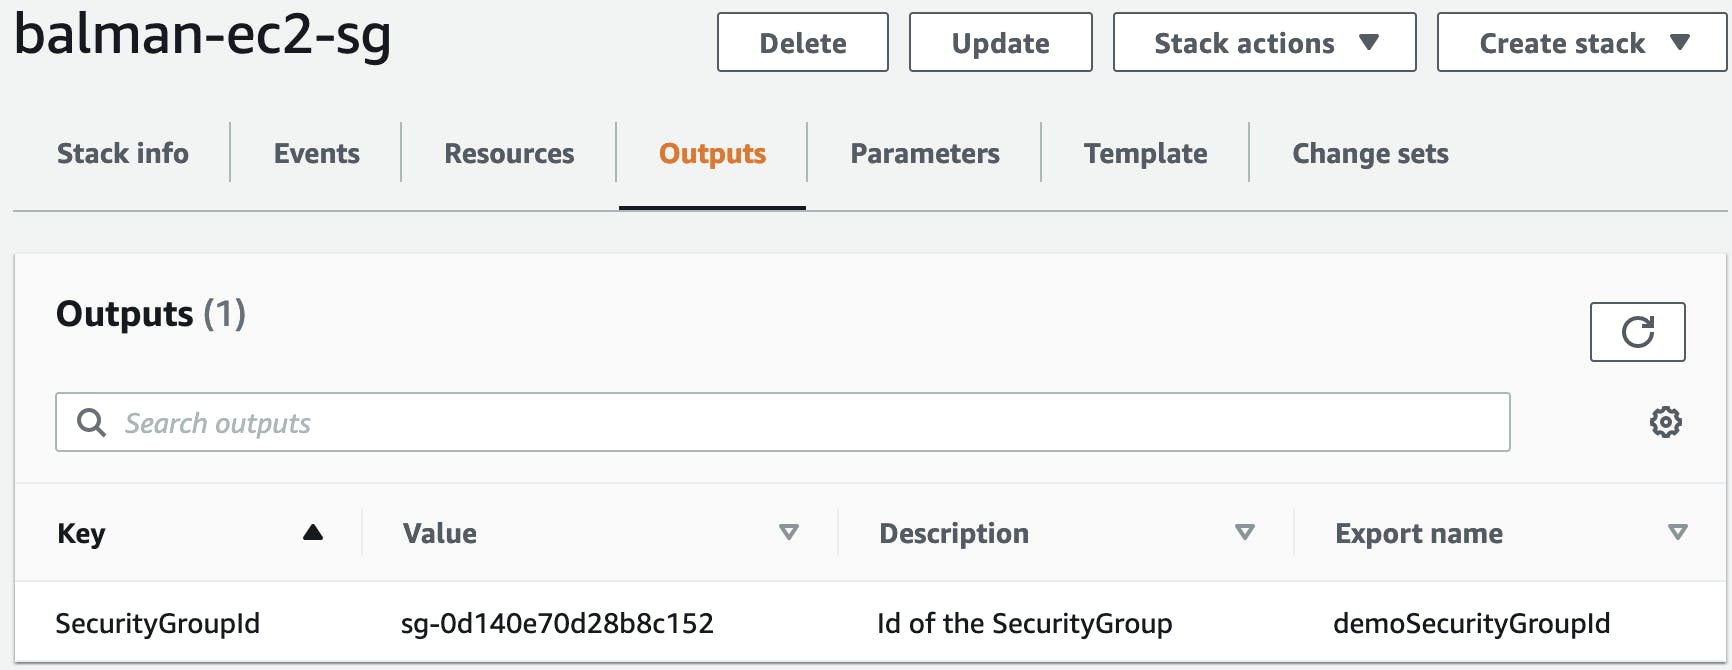
Outputs:
SecurityGroupId:
Description: Id of the SecurityGroup
Value: !Ref ProdSecurityGroup #This will get Id of the Security Group. Please look at Return values section to find more details.
Export:
Name: demoSecurityGroupId
outputs section
Now let's use the template below to import the security group id
ec2-outputs.yaml
Resources:
  MyEC2Instance:
    Type: AWS::EC2::Instance
    Properties:
      InstanceType: 't2.micro'
      ImageId: ami-09e67e426f25ce0d7
      SubnetId: subnet-066a074e239e6a0a3
      SecurityGroupIds:
        - !ImportValue demoSecurityGroupId
Final Thoughts
This is no way the exhaustive details of the CloudFormation but a mere high level overview of various components that are needed to get anyone started with it. There are other advanced topics that are completely left untouched in this blog: nested CloudFormation, custom CloudFormation, CloudFormation modules, Failure Handling, CloudFormation Registry, Transform, Macros which can be resources for other blogs. Please find the sample CloudFormation files in this Github Repo.
Any comments, feedback are welcome. Thank You.